Castle & Sand Kc7 Write Up
**Castle and Sand is a KC7 module that I recommend to anyone once they become comfortable with Kusto Query Language (KQL). My objective in this write-up is to provide additional context on what a SOC analyst does, including the incorporation of the Kill Chain, MITRE ATT&CK, and general querying.
I will not be providing all the answers in this write-up. I will give enough hints so that the reader can feel the same satisfaction I felt when I got the answers.
Shark Attack
We begin this module with a ransom note, in which all the company’s files have been locked. This is the reality of ransomware. There are a few resources online for ransom notes. I would recommend Ransomlook.io for that and more.
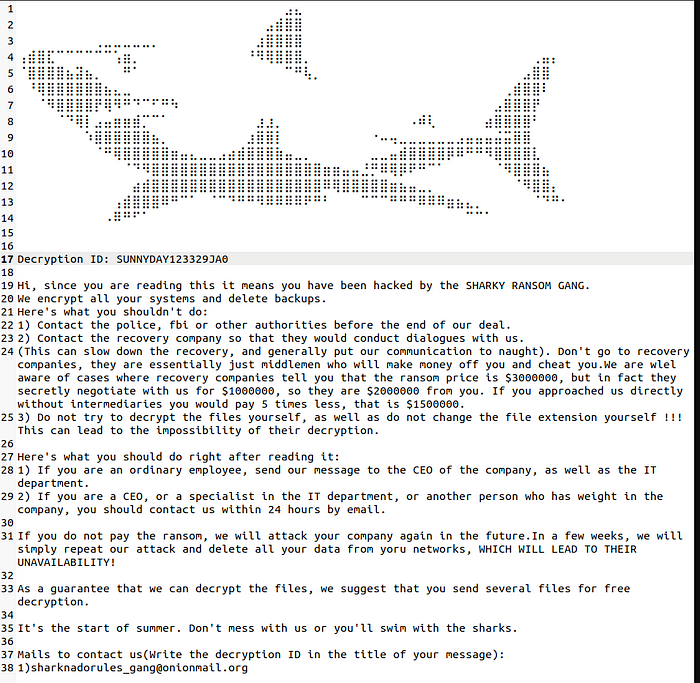
This part of the module is straightforward, involving the extraction of information from the ransom note. And it starts at the end of our Kill Chain, Actions on Objectives. Our threat actor has obtained access to Castle and Sand’s network and encrypted critical files. Since we have the file name PAY_UP_OR_SWIM_WITH_THE_FISHES.txt we can see where this file is present.
1
2
3
FileCreationEvents
| where filename has "PAY_UP_OR_SWIM_WITH_THE_FISHES.txt"
| distinct hostname
That’s a lot of affected hostnames. Next, we will want to combine those results with a different table. This will be very important when creating dynamic queries. Let operators will be our lifeblood in this module. Sure, you can make an array with your previous results, but that involves more work and is quite manual (especially with 774 results!), especially as you start to pivot.
1
2
3
4
5
6
7
8
let affected =
FileCreationEvents
| where filename has "PAY_UP_OR_SWIM_WITH_THE_FISHES.txt"
| distinct hostname;
Employees
| where hostname in (affected)
| distinct role
To quickly break down what is happening, we created a let statement called affected. affected is the previous result and our array for our following query. Also note that affected can be anything. Always have a semicolon (;) at the end of your let statements. The next question aims to determine the number of distinct roles affected by the ransomware attack. Next, we want to pivot to hostnames that belong to IT employees.
1
2
3
4
5
6
7
8
let affected =
FileCreationEvents
| where filename has "PAY_UP_OR_SWIM_WITH_THE_FISHES.txt"
| distinct hostname
;
Employees
| where hostname has_any (affected)
| where role has "IT"
IT employees are a frequent target of threat actors because they have privileged access to the network. They provide the keys to the kingdom and facilitate lateral movement. Or, more deceptively, after gaining reconnaissance on the IT workers at an organization, they will pose as one of them. Scattering Spider is an example of this. We will be moving past Q9–10 due to the query mostly being provided. After finding our shark-themed file, we can gain additional information on its reach within the network.
1
2
3
Email
| where sender has "legal.sand@verizon.com"
| where recipient contains "@castleandsand.com"
We see something interesting after querying our sender email legal.sand@verizon.com the reply_to column has additional email addresses. This is a tactic called Reply-To Spoofing. So, let’s extend our net to include those spoofed emails.
1
2
3
4
5
6
7
8
9
let sussy =
Email
| where sender has "legal.sand@verizon.com"
| where recipient contains "@castleandsand.com"
| distinct reply_to;
Email
| where reply_to has_any (sussy)
| extend asd = tostring(parse_url(link).Host)
| distinct asd
Let’s break down what we are doing. From the Email table, we are creating a new column called asd, where we parse our link. Parsing is going to become important as we build these queries. As I mentioned before, we can do an array with the same values. But this is when dynamic queries become more important. We are locked in on that array. By creating this query, we have something that can flag future IOCs. We use the distinct parameter to create an array for use in our subsequent queries.
For Q30, we want to gather the IP addresses that our malicious domains resolve to. Which involves what? (This has been mentioned previously.) Q31 takes those IPs and checks them with AuthenticationEvents.
Q33 becomes more interesting because, like previously, we have to parse the files from the emails and then match them to the FileCreationEvents:
1
2
3
4
5
6
7
8
9
10
11
12
13
let sussy =
Email
| where sender has "legal.sand@verizon.com"
| where recipient contains "@castleandsand.com"
| distinct reply_to;
let badfiles =
Email
| where reply_to has_any (sussy)
| extend filepath = tostring(parse_url(link).Path)
| extend filename = extract(@"([^\/]+)$", 1, filepath)
| distinct filename;
FileCreationEvents
| where filename has_any (badfiles)
Let’s focus on the newest part of our query. | extend filename = extract(@”([^\/]+)$”, 1, filepath) . Regular Expressions (Regex) are a handy resource for creating modular queries.
[^\/]+— Match one or more characters that are not a forward slash (/).
— [^\/] is a character class that says “any character except /”.
— + means “one or more of those characters”.
()— Capture group #1: This wraps the pattern we want to extract.$— End of string anchor, ensuring we’re capturing the last segment after the final slash — the filename.
If we do not include this when parsing our url column, it will only contain links. We take the parsed file results and count the number of matches we obtain.
We now have a list of hosts that have our threat actor’s malicious files. We will now review the list of hosts and cast a wide net to examine general activity. But we want to narrow that down. We don’t care about what is happening in our environment before the first file creation of our malicious files. This is the Installation phase of the Kill Chain. So, let’s create a parameter for any time after the first file creation:
1
2
3
4
5
6
7
8
9
10
11
12
13
14
15
16
17
18
let sussy =
Email
| where sender has "legal.sand@verizon.com"
| where recipient contains "@castleandsand.com"
| distinct reply_to;
let badfiles =
Email
| where reply_to has_any (sussy)
| extend filepath = tostring(parse_url(link).Path)
| extend filename = extract(@"([^\/]+)$", 1, filepath)
| distinct filename;
let badhosts=
FileCreationEvents
| where filename has_any (badfiles)
| distinct hostname;
ProcessEvents
| where hostname has_any (badhosts)
| where timestamp > datetime(2023-05-25T16:43:20.000Z)
We will be able to answer the next few questions with this query. Q41 requires a little prior knowledge about password-cracking tools. However, the tool is seen within the first 50 logs of our query above.
Q43 and Q44 are considered challenging questions and won’t be provided with solutions. I will provide a couple of hints. We are leveraging the concepts we learned previously. There is nothing new. It’s just more investigative thinking. From the query above, we can find the answer for Q43. Now, determine how to filter it to obtain your answer.
Q44 introduces a couple of parameters that were not previously covered. We want a count, but we want to summarize which IP was seen the most ;)
For Q45–47, we can simplify our query by restricting it to the parent processes that are executing the PowerShell from Q42.
Hunting the Shark
Section 3 offers a real treat in the form of a Twitter post featuring a ransom video. This section starts with some Open Source Intelligence (OSINT). Threat hunters use publicly available resources to find out more information about domains, IPs, and social media profiles to uncover the threat actor’s IOCs or even discover their Tactics, Techniques, and Procedures (TTPs). The Pyramid of Pain is a good reference on how painful it would be for a threat actor to recover from when trying to stay under the radar.
This section has you collect some artifacts from Section 2 and is shorter. We will take our last query from Section 2 and build upon it. I will be cutting off everything I used in the previous section. If you have been able to build from your previous queries with let statements, the following query will get your results.
1
2
3
4
<SNIP>
ProcessEvents
| where parent_process_name has_any (badprocess)
| distinct parent_process_hash
VirusTotal is a great tool to use when checking out IOCs. Chances are that someone has already encountered the same IOCs you are researching. And they have the resources to identify which threat actor it is associated with. Most of our hashes are associated with real ransomware. I appreciate this section as a bit of a breather from our query building to conduct some threat hunting on IOCs.
Sand in my (o)(o)
We begin the module with a common attack technique, Establish Email Accounts (T1585), where a new threat actor uses disposable accounts from common email domains — in our case castleandsand_official@outlook[.]com. Similar to Section 2, our threat actor is leveraging Reply-to spoofing to get a second email address. We expand our net and pivot to the domains found in the links.
1
2
3
4
Email
| where sender has "castleandsand_official@outlook.com" or sender has "castleandsandlegaldepartment@gmail.com"
| extend domain = tostring(parse_url(link).Host)
| distinct domain
On the surface, these sites appear legitimate, but the threat actor is attempting to gain initial access through a sub-technique called Drive-by Compromise (T1189). This is our Delivery phase of the Kill Chain. The actual answer to Q4 is the more common term (which is also referenced in T1189). For Q6, we aim to cast a wide net to determine the number of external IPs that successfully log into our network using the users identified in the previous questions. Let’s break down what we’re looking for — successful Logins and external IPs. Internally, we use private IP space, as noted in RFC 1918. You will see the space that is used in the Employees table.
After combining the results, we have a fair number of external IPs that have successfully logged into our network. We pivot from the IPs to gather from external authentication events to files that may have been downloaded. For Q7, we aim to collect all the unique names from the downloaded files. When you encounter all of the files, you will find 37 results. Some of those results have overlapping files. I had trouble with this one, so I made an extended column and extracted the files. I did this by utilizing Regex from the output section. I had an extra null value, which I removed by using | where isnotempty(filename).
From Q8, we have narrowed down our IP list to IPs that we can comfortably label as IOCs. From there, we can identify which domains resolve to those IPs and note any additional IOCs. For Q10, we gain a more solid understanding of the extent of compromised hosts from our confirmed IOCs.
1
2
3
4
5
6
7
8
9
10
11
12
13
let drive_by =
Email
| where sender has "castleandsand_official@outlook.com" or sender has "castleandsandlegaldepartment@gmail.com"
| extend domain = tostring(parse_url(link).Host)
| distinct recipient;
let target_employees =
Employees
| where email_addr has_any (drive_by)
| distinct username;
AuthenticationEvents
| where username in (target_employees)
| where result == "Successful Login"
| distinct hostname
For Q11, we uncover more potentially malicious files that we created on compromised hosts. However, we want to know which file was created afterward, and this is when we find our Exploitation and Installation of the Kill Chain. I spent the better part of an hour trying to figure out how to enumerate the next file creation to discover our payload.
1
2
3
4
5
6
7
8
9
10
11
<SNIP>
let victim_host =
FileCreationEvents
| where filename in (sussy_files)
| distinct hostname;
FileCreationEvents
| where hostname in (victim_host)
| serialize
| extend next_timestamp_filename = next(filename)
| where filename in (sussy_files)
| where next_timestamp_filename !in (sussy_files)
We can now discover the extent of the payload on other hosts for Q13. Not only that, but we also establish an SSH connection using a private key with Putty’s command-line SSH tool. This falls under multiple MITRE ATT&CK TTPs (T1021.004), (T1552.004), (T1105), (T1572), and (T1048). For the Kill Chain, this would be Command and Control (C2) and Actions of Objectives. Their objective was to exfiltrate data.
A Clean Sweep
This module serves as the culmination of all the hard work behind the previous modules. You have thought hard and developed some great KQL skills along the way. In the final stretch, you bring everything together by conducting some OSINT using Google. There is even a fun little cipher puzzle near the end using CyberChef. I suggest conducting additional research on ciphers in conjunction with the provided message.
Conclusion
By the end of the module, we have uncovered how two threat actors compromised Castle and Sand. SharkBoyz is a ransomware gang that infiltrated Castle and Sand through phishing emails with the intent of encrypting data for ransom. Our second threat actor is less clear, but they also gained initial access through phishing emails and executed a payload that allowed them to exfiltrate data to their command and control (C2) nodes. There is one indicator that has been attributed to APT41, but attribution is tricky. Anyway, enjoy the final gift of the module. It won’t let you down.**